Saturday, 30 November 2013

Creating a Dev Center Account

Creating a Dev Center Account 

In the previous post What to do with Dream spark Key ??? we had seen how to create a Dream spark account and use your Dream spark key to verify you as a student.

In this post we gonna see how to create dev center account (http://dev.windowsphone.com/)

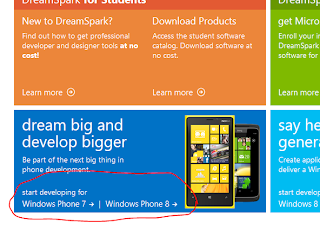
  • First go to http://dev.windowsphone.com/  and click sign in 
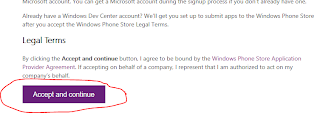
  • Now you will see the Join the program page and in the bottom of page click on Accpet and Continue button


Creating Dev Center Account
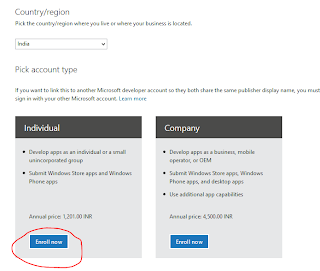
  • Then in the next page choose your country and choose account type as individual
dreamspark account

  • You can see a payment page where you will be asked to pay Rs. 1200 but don't be panic since we can change the amount to zero by pasting a Registration code and then click Update Total button ( The Registration code is taken from the dreamspark.com website and the steps to get the code are explained below)

 Dreamspark.com
  •  Now in the next page there will be steps how to get developer tools and develop apps and In the step three (Bottom of the page) you can see Get your Registration Code.

Dreamspark.com

  •  Then in the upcoming page choose Get code now (If your account is not verified already choose verify now and login again in dream spark.com In my screen shot my account is already verified).
Dreamspark.com
  • Now copy the code (In my case SC35YND) and this is the registration code now paste the code in dev.windowsphone.com and update total button you can see the amount changed to zero.
  • Click on next button will take you to the Payment page 
  • In the payment page choose payment option .Don't worry we will be charged only Rs.2 as service charge for international transaction not more than that. (Prefer to use a visa card particularly ICICI bank card in my personal suggestion).
  • Choose OK at further steps thats solve your developer account is ready.
Hope you enjoyed the post 
If you have queries Feel free to mail as at digitalnativehelp@gmail.com

Saturday, 26 October 2013

Windows Phone SDK 8.0 Failed Installation Problem

Setup Failed !

Windows Software Development Kit Tools for Windows Store.A required certificate is not valid within its validity period when verifying against the current system clock or timestamp in the signed file.

Windows Phone SDK 8.0 Assembies User Cancellation installation

Windows Software Development Kit Tools for Windows Store.A required certificate is not valid within its validity period when verifying against the current system clock or timestamp in the signed file.

Possible Solutions:

  • First uninstall all the components which are installed before you get the above error message by go to control panel -> Program features -> Windows Phone 8 SDK
  • Your setup might be expired:

    There is a chance your setup might be expired. To solve this issue go to your setup file of Windows phone 8 SDK and right click on  right click on WPexpress_full.exe and goto properties and then click on Digital Signatures tab check the timestamp and change your system's time within the period mentioned in the timestamp tab.

    It is the most suggested solution through out internet forums and Facebook Discussions.

    My own experience with this error:

    I tried reinstalling for 100 s of time and finally got the solution by following the below procedure.
    • Installed fresh Windows 8 OS
    • Update Windows to up to date ( Update can solve most issues in my experience)
    • Now install Visual Studio 2012 Ultimate in your system.
    • Now install the WP 8 SDK .It works fine for me

    Try installing Direct installation rather than using ISO for WP 8 SDk:

    Follow the same three steps above and now go to Visual Studio ultimate and resgister with your credentials from Microsoft or you can continue the 90 day trial pack from Microsoft.

    Now open Visual Studio 2012 Ultimate and click on New project --> Windows Phone in installed template and now click download Windows Phone 8 SDK. You will seen the installation directly starts but need internet got online installation.

    Hope your errors solved 

    Please post ur comments for our improvement !!!

Thursday, 24 October 2013

Microsoft Student Partner Selection Process 2013/14 How to Apply

Microsoft Student Partner Selection Process 2013/14:

microsoft Student Partner

 What MSPs will Do?

  • As an MSP, you'll be informed about the latest Microsoft technologies. You will acquire the tools and training to lead technology discussions on your campus.
  • You will demonstrate the newest technologies, host tech events, and connect with like-minded students and faculty.
  • You will lead the Microsoft Student Community at your campus.
  • You will work closely with Microsoft and the other MSPs, and build and important network of contacts.
  • You will get a proof of your MSP participation that can be used when you apply for work.

How to become a MSP?

Every year Microsoft is conducting a selection process for selecting best students to be part of MSP program.

For this year 2013/14 the selection is started already.

microsoft Student Partner Digital Native

How to Apply for MSP India selection 2013/14?

MSP selection 2013's Application cycle is from 25th October 2013 to 31st December 2013.

Steps: 

Complete the online application form at https://www.microsoftstudentpartners.com/Registration/Apply

Complete at least any two activities from list of 4 activities given ( Deadline to complete activities 31st December 2013)
Even if you finish two activities from above four you are eligible for next round. But if you are finishing more than two activities means you will be given more preference.

Recommendation latter from MSP or Faculty stating your quality or attributes for selecting as Microsoft Student Partner.

If you finish any two activities from above you will be eligible to attend the knock out round telephone interview with MSP team.

So the race begins 

For complete detail of the above activities, rules and regulations visit https://www.microsoftstudentpartners.com/Home/Apply

Wish you very all the best

Regards
Vigneshwaran A 
(Digital Native Team)
Microsoft Student Partner,
Mozilla Student Ambassador,
Writer/Contributor Wikipedia.


Saturday, 12 October 2013

What to do with Dream sprak key ???

What to do with Dream spark key??

In my previous post I posted about why we need dream spark key and how to get a free dream spark key.

Here is the next post in the series of creating Dev center account What to do with Dream Spark key ???


Then click on Students tab in dreamspark.com 

dreamspark.com

Now create individual account in the next page by clicking on Create account under individual category.


Then fill up the form in the next page I suggest you to use your live id for this registration step.

Now the last step is to verify you are a student.You will be given three choices to prove you are a student 
  •  Get verification through school
  • I have an ISIC card
  • I have a verification code
Now choose third option I have a verification code and now enter the Dream spark key you received from Microsoft. (Don't misuse the key since its valid for only one time, also don't share key with anyone)

Digital native Dreamspark.com
 
Thats all you will be verified as student by Microsoft Dream spark.

Next step is to create a dev center account

Learn how to create a dev center account at http://digitalnativedev.blogspot.in/2013/11/creating-dev-center-account.html

Friday, 11 October 2013

Chance to get free Windows Phone Developer account !!!

Chance to get free Windows Phone Dev account !!!

dev.windowsphone.com


To publish apps in windows phone store, you need to create an account in Windows Phone developer account .

Please visit the link  http://dev.windowsphone.com/

It will cost at least 50 $ to create a dev center account but for students its free Absolutely free !!!

To get free account all you need is a Dream spark Key

Dream spark key  is issued by Microsoft to students to get free access to windows phone and Windows Store developer center.

But its not easy to get a Dream spark key unless you participate in any Microsoft Hackethons or Your college registered with Microsoft.

Now you have a golden opportunity to get a Dream Spark key for free from DVLUP Contest, A contest for Windows Phone App Development.

To get a Dream spark key:

dreamspark


  • Create a new live id for free (also called as Microsoft ID) at live.com.
  • Now send a mail to QA.wp@live.com stating you are a student and you need a dream spark key for app development along with the scanned copy of your college ID from your new Live id.
  • Please be patience until they verify your ID and send you a dream spark ID.( It may take at least two days to get a key)
  • Now you can use that key for creating your dev center account (Remember the key is one time validity key so don't share it with others).


What to do with Dream spark key ???

How to create Dev center account ???

How to participate in DVLUP contest and win Lumia phones???

Confused ??? 

Read more in our coming post  !!!!

Friday, 9 August 2013

Using Bing Map in your Windows Phone App

Using Bing Map in your Windows Phone App


Bing map


In this post I explained how to use the bing map in your Windows Phone Application.

To use the Map service first we have to import the following statements

   using System.Device.Location;

   using Microsoft.Phone.Tasks;
  
You will get the following error in the statement

     using System.Device.Location;

Bing map


To resolve this error follow the steps 

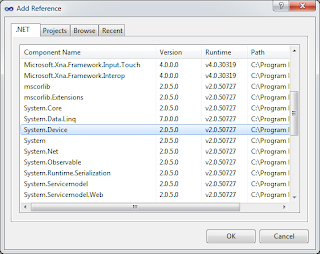
First right click on your project name and Click on Add Reference 


Bing map


Then search for the System.Devices in the assembly and include it thats it your error is resolved 

Now use the following code to search Bing Map 

            BingMapsDirectionsTask bingMapsDirectionsTask = new BingMapsDirectionsTask();

            LabeledMapLocation endpt = new LabeledMapLocation("Tanjore", null);

            LabeledMapLocation startpt = new LabeledMapLocation("Chennai", null);

            bingMapsDirectionsTask.Start = startpt;
            bingMapsDirectionsTask.End = endpt;
            bingMapsDirectionsTask.Show();
  

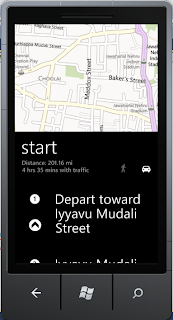
This is the code for Get Directions in Bing Map (I created App to get direction between Tanjore and Chennai ).

MainPage.xaml

<phone:PhoneApplicationPage

    x:Class="Map_Sample.MainPage"

    xmlns="http://schemas.microsoft.com/winfx/2006/xaml/presentation"
    xmlns:x="http://schemas.microsoft.com/winfx/2006/xaml"
    xmlns:phone="clr-namespace:Microsoft.Phone.Controls;assembly=Microsoft.Phone"
    xmlns:shell="clr-namespace:Microsoft.Phone.Shell;assembly=Microsoft.Phone"
    xmlns:d="http://schemas.microsoft.com/expression/blend/2008"
    xmlns:mc="http://schemas.openxmlformats.org/markup-compatibility/2006"
    mc:Ignorable="d" d:DesignWidth="480" d:DesignHeight="768"
    FontFamily="{StaticResource PhoneFontFamilyNormal}"
    FontSize="{StaticResource PhoneFontSizeNormal}"
    Foreground="{StaticResource PhoneForegroundBrush}"
    SupportedOrientations="Portrait" Orientation="Portrait"
    shell:SystemTray.IsVisible="True">

    <!--LayoutRoot is the root grid where all page content is placed-->
    <Grid x:Name="LayoutRoot" Background="Transparent">
        <Grid.RowDefinitions>
            <RowDefinition Height="Auto"/>
            <RowDefinition Height="*"/>
        </Grid.RowDefinitions>

        <!--TitlePanel contains the name of the application and page title-->
        <StackPanel x:Name="TitlePanel" Grid.Row="0" Margin="12,17,0,28">
            <TextBlock x:Name="ApplicationTitle" Text="MY APPLICATION" Style="{StaticResource PhoneTextNormalStyle}"/>
            <TextBlock x:Name="PageTitle" Text="Map Sample" Margin="9,-7,0,0" Style="{StaticResource PhoneTextTitle1Style}"/>
        </StackPanel>
        <Button Content="Get Directions" Grid.Row="1" Height="72" HorizontalAlignment="Left" Margin="113,200,0,0" Name="button1" VerticalAlignment="Top" Width="303" Click="button1_Click" />
        <!--ContentPanel - place additional content here-->
    </Grid>

    <!--Sample code showing usage of ApplicationBar-->
    <!--<phone:PhoneApplicationPage.ApplicationBar>
        <shell:ApplicationBar IsVisible="True" IsMenuEnabled="True">
            <shell:ApplicationBarIconButton IconUri="/Images/appbar_button1.png" Text="Button 1"/>
            <shell:ApplicationBarIconButton IconUri="/Images/appbar_button2.png" Text="Button 2"/>
            <shell:ApplicationBar.MenuItems>
                <shell:ApplicationBarMenuItem Text="MenuItem 1"/>
                <shell:ApplicationBarMenuItem Text="MenuItem 2"/>
            </shell:ApplicationBar.MenuItems>
        </shell:ApplicationBar>
    </phone:PhoneApplicationPage.ApplicationBar>-->

</phone:PhoneApplicationPage>


MainPage.xaml.cs

using System;
using System.Collections.Generic;
using System.Linq;
using System.Net;
using System.Windows;
using System.Windows.Controls;
using System.Windows.Documents;
using System.Windows.Input;
using System.Windows.Media;
using System.Windows.Media.Animation;
using System.Windows.Shapes;
using Microsoft.Phone.Controls;
using System.Device.Location;
using Microsoft.Phone.Tasks;

namespace Map_Sample
{
    public partial class MainPage : PhoneApplicationPage
    {
        // Constructor
       
        public MainPage()
        {
            InitializeComponent();
        }

        private void button1_Click(object sender, RoutedEventArgs e)
        {
            BingMapsDirectionsTask bingMapsDirectionsTask = new BingMapsDirectionsTask();
            LabeledMapLocation endpt = new LabeledMapLocation("Tanjore", null);
            LabeledMapLocation startpt = new LabeledMapLocation("Chennai", null);

            bingMapsDirectionsTask.Start = startpt;
            bingMapsDirectionsTask.End = endpt;
            bingMapsDirectionsTask.Show();
        }
    }
}

Sample Output
Bing mapBing map

Download Sample Code