Showing posts with label Windows Phone for Beginners. Show all posts

Saturday, 30 November 2013

Creating a Dev Center Account

Creating a Dev Center Account 

In the previous post What to do with Dream spark Key ??? we had seen how to create a Dream spark account and use your Dream spark key to verify you as a student.

In this post we gonna see how to create dev center account (http://dev.windowsphone.com/)

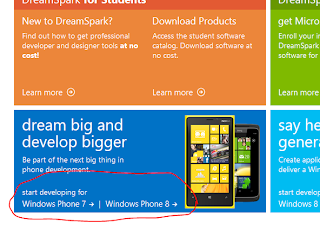
  • First go to http://dev.windowsphone.com/  and click sign in 
  • Now you will see the Join the program page and in the bottom of page click on Accpet and Continue button


Creating Dev Center Account
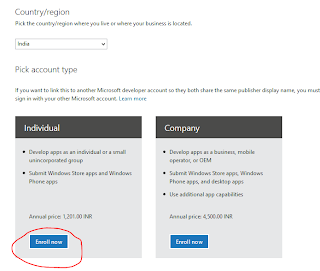
  • Then in the next page choose your country and choose account type as individual
dreamspark account

  • You can see a payment page where you will be asked to pay Rs. 1200 but don't be panic since we can change the amount to zero by pasting a Registration code and then click Update Total button ( The Registration code is taken from the dreamspark.com website and the steps to get the code are explained below)

 Dreamspark.com
  •  Now in the next page there will be steps how to get developer tools and develop apps and In the step three (Bottom of the page) you can see Get your Registration Code.

Dreamspark.com

  •  Then in the upcoming page choose Get code now (If your account is not verified already choose verify now and login again in dream spark.com In my screen shot my account is already verified).
Dreamspark.com
  • Now copy the code (In my case SC35YND) and this is the registration code now paste the code in dev.windowsphone.com and update total button you can see the amount changed to zero.
  • Click on next button will take you to the Payment page 
  • In the payment page choose payment option .Don't worry we will be charged only Rs.2 as service charge for international transaction not more than that. (Prefer to use a visa card particularly ICICI bank card in my personal suggestion).
  • Choose OK at further steps thats solve your developer account is ready.
Hope you enjoyed the post 
If you have queries Feel free to mail as at digitalnativehelp@gmail.com

Saturday, 26 October 2013

Windows Phone SDK 8.0 Failed Installation Problem

Setup Failed !

Windows Software Development Kit Tools for Windows Store.A required certificate is not valid within its validity period when verifying against the current system clock or timestamp in the signed file.

Windows Phone SDK 8.0 Assembies User Cancellation installation

Windows Software Development Kit Tools for Windows Store.A required certificate is not valid within its validity period when verifying against the current system clock or timestamp in the signed file.

Possible Solutions:

  • First uninstall all the components which are installed before you get the above error message by go to control panel -> Program features -> Windows Phone 8 SDK
  • Your setup might be expired:

    There is a chance your setup might be expired. To solve this issue go to your setup file of Windows phone 8 SDK and right click on  right click on WPexpress_full.exe and goto properties and then click on Digital Signatures tab check the timestamp and change your system's time within the period mentioned in the timestamp tab.

    It is the most suggested solution through out internet forums and Facebook Discussions.

    My own experience with this error:

    I tried reinstalling for 100 s of time and finally got the solution by following the below procedure.
    • Installed fresh Windows 8 OS
    • Update Windows to up to date ( Update can solve most issues in my experience)
    • Now install Visual Studio 2012 Ultimate in your system.
    • Now install the WP 8 SDK .It works fine for me

    Try installing Direct installation rather than using ISO for WP 8 SDk:

    Follow the same three steps above and now go to Visual Studio ultimate and resgister with your credentials from Microsoft or you can continue the 90 day trial pack from Microsoft.

    Now open Visual Studio 2012 Ultimate and click on New project --> Windows Phone in installed template and now click download Windows Phone 8 SDK. You will seen the installation directly starts but need internet got online installation.

    Hope your errors solved 

    Please post ur comments for our improvement !!!

Saturday, 29 June 2013

Windows Phone for Absoulte Beginners part 4

Working with CheckBox:

windows phone 7


The specialty of check box is that we can choose multiple choices from the given also we can able to select nothing from the list. Check boxes are normally have two states such as checked and unchecked if checked means its Boolean equivalent is true, if unchecked means its Boolean equivalent is false.

Using Check box in Windows phone:

To use Check box in Windows Phone use the following code given below.

<CheckBox Content="Cricket"  Height="72" HorizontalAlignment="Left" Margin="124,133,0,0" Name="checkBox1" VerticalAlignment="Top" Width="144" />

To access the state of Checkbox in c# code use as following
checkBox1.IsChecked
This will return the state of checkbox whether it is checked or not in bool? type
To make Checkbox to be enable by default use the following code
<CheckBox Content="Volley Ball" Height="72" HorizontalAlignment="Left" Margin="124,211,0,0" Name="checkBox4" VerticalAlignment="Top" Width="170" Grid.Row="1" IsChecked="True" />

So the code is actually IsChecked=”True”.

Here we developed a simple application where we have four checkboxes and we show the number of checkboxes in checkboxes checked in run time in a textbox below.

Sample Application:


MainPage.xaml


<phone:PhoneApplicationPage
    x:Class="TextBox.MainPage"
    xmlns="http://schemas.microsoft.com/winfx/2006/xaml/presentation"
    xmlns:x="http://schemas.microsoft.com/winfx/2006/xaml"
    xmlns:phone="clr-namespace:Microsoft.Phone.Controls;assembly=Microsoft.Phone"
    xmlns:shell="clr-namespace:Microsoft.Phone.Shell;assembly=Microsoft.Phone"
    xmlns:d="http://schemas.microsoft.com/expression/blend/2008"
    xmlns:mc="http://schemas.openxmlformats.org/markup-compatibility/2006"
    mc:Ignorable="d" d:DesignWidth="480" d:DesignHeight="768"
    FontFamily="{StaticResource PhoneFontFamilyNormal}"
    FontSize="{StaticResource PhoneFontSizeNormal}"
    Foreground="{StaticResource PhoneForegroundBrush}"
    SupportedOrientations="PortraitOrLandscape" Orientation="Portrait"
    shell:SystemTray.IsVisible="True">

    <!--LayoutRoot is the root grid where all page content is placed-->
    <Grid x:Name="LayoutRoot" Background="Transparent">
        <Grid.RowDefinitions>
            <RowDefinition Height="Auto"/>
            <RowDefinition Height="*"/>
        </Grid.RowDefinitions>

        <CheckBox Content="Cricket" Grid.Row="1" Height="72" HorizontalAlignment="Left" Margin="124,133,0,0" Name="checkBox1" VerticalAlignment="Top" Width="144" />
        <CheckBox Content="Basket Ball" Height="72" HorizontalAlignment="Left" Margin="124,367,0,0" Name="checkBox2" VerticalAlignment="Top" Width="184" Grid.Row="1" />
        <CheckBox Content="Tennis" Height="72" HorizontalAlignment="Left" Margin="124,289,0,0" Name="checkBox3" VerticalAlignment="Top" Width="144" Grid.Row="1" />
        <CheckBox Content="Volley Ball" Height="72" HorizontalAlignment="Left" Margin="124,211,0,0" Name="checkBox4" VerticalAlignment="Top" Width="170" Grid.Row="1" IsChecked="False" />
        <TextBlock Grid.Row="1" Height="47" HorizontalAlignment="Left" Margin="28,94,0,0" Name="textBlock1" Text="Intrested in:" VerticalAlignment="Top" FontSize="32" Width="204" />
        <TextBox Grid.Row="1" Height="72" HorizontalAlignment="Left" Margin="161,617,0,0" Name="textBox1" Text="" VerticalAlignment="Top" Width="147" />
        <TextBlock Grid.Row="1" Height="30" HorizontalAlignment="Left" Margin="124,563,0,0" Name="textBlock2" Text="Number of boxes checked" VerticalAlignment="Top" />
        <!--ContentPanel - place additional content here-->
    </Grid>

</phone:PhoneApplicationPage>

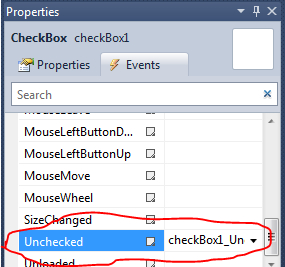
Here we generated two methods checked and unchecked where checked will work whenever the checkbox is checked and whenever checkbox is unchecked uncheck method will work. We provided screen shots of how to generate the Check and Unchecked methods here
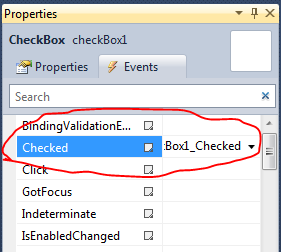

windows phone properties


MainPage.xaml.cs

using System;
using System.Collections.Generic;
using System.Linq;
using System.Net;
using System.Windows;
using System.Windows.Controls;
using System.Windows.Documents;
using System.Windows.Input;
using System.Windows.Media;
using System.Windows.Media.Animation;
using System.Windows.Shapes;
using Microsoft.Phone.Controls;

namespace TextBox
{
    public partial class MainPage : PhoneApplicationPage
    {
        int count = 0;
        // Constructor
        public MainPage()
        {
            InitializeComponent();
        }

     private void checkBox1_Checked(object sender, RoutedEventArgs e)
        {
            count++;
            textBox1.Text = Convert.ToString(count);
        }

    private void checkBox1_Unchecked(object sender, RoutedEventArgs e)
        {
            count--;
            textBox1.Text = Convert.ToString(count);
        }

      private void checkBox4_Checked(object sender, RoutedEventArgs e)
        {
            count++;
            textBox1.Text = Convert.ToString(count);
        }

    private void checkBox4_Unchecked(object sender, RoutedEventArgs e)
        {
            count--;
            textBox1.Text = Convert.ToString(count);
        }

    private void checkBox3_Unchecked(object sender, RoutedEventArgs e)
        {
            count--;
            textBox1.Text = Convert.ToString(count);
        }

      private void checkBox3_Checked(object sender, RoutedEventArgs e)
        {
            count++;
            textBox1.Text = Convert.ToString(count);
        }

      private void checkBox2_Checked(object sender, RoutedEventArgs e)
        {
            count++;
            textBox1.Text = Convert.ToString(count);
        }

    private void checkBox2_Unchecked(object sender, RoutedEventArgs e)
        {
            count--;
            textBox1.Text = Convert.ToString(count);
        }
      
    }
}


Output will be resemble like the one given below

windows phone


Saturday, 25 May 2013

Windows Phone for Absolute Beginners Part 2

Working with Basic tools in Windows Phone App

In our way learning some basic tools in any platform will give you confidence to learn the platform completely yourself.So we always ask people stick to basic things in any platform.So here we discussed basic tools like TextBlock, TextBox and Button.

Working with TextBlock:

TextBlock is nothing but the label.The main thing you have to remember about Textblock is that content of TextBlock can't be changed by user.To understand what is TextBlock here we provided a good example.

Digital native


To add TextBlock into your application click on Toolbox in right side and just drag and drop TextBlock into your phone design.

digitalnative

You can also add TextBlock through XAML code

<TextBlock Height="30" HorizontalAlignment="Left" Margin="145,54,0,0" Name="textBlock1" Text="TextBlock" VerticalAlignment="Top" />

Working with TextBox:

As you seen in the above image TextBox are generally fields where user will enter their inputs.E.g the box where you enter your mail id in gmail login page is the textbox.

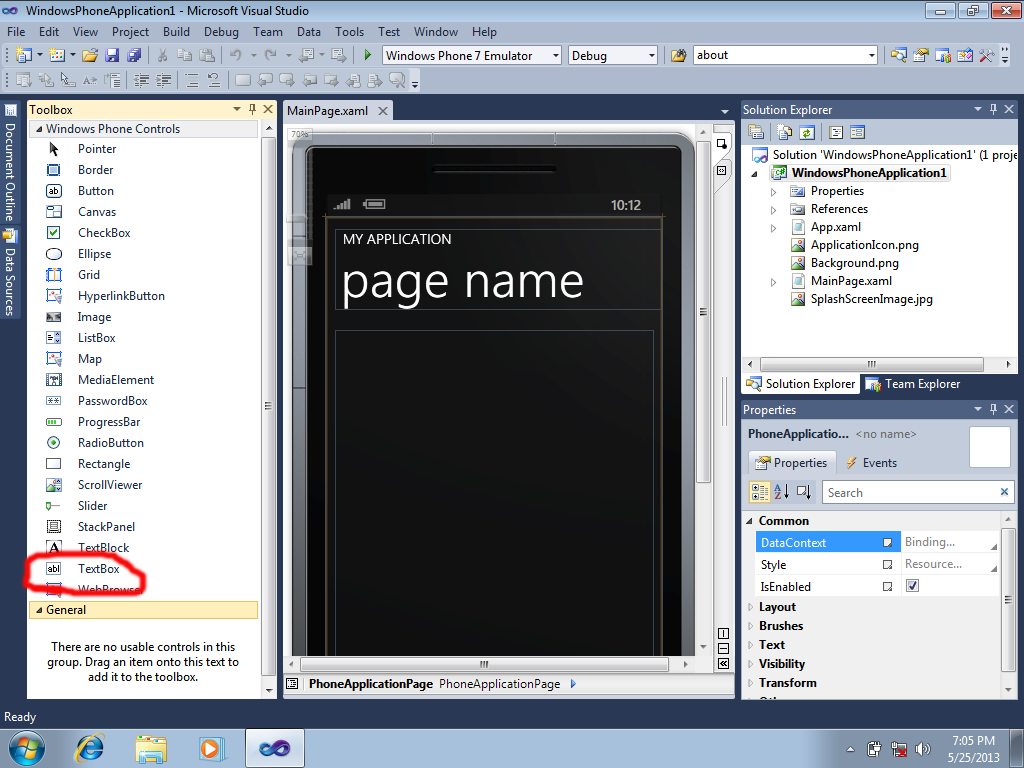
To add TextBox also just click on ToolBox in right side and just drag and drop TextBox into your phone design.

digitalnative


You can also add TextBox through XAML code directly as

<TextBox Height="72" HorizontalAlignment="Left" Margin="12,116,0,0" Name="textBox1" Text="TextBox" VerticalAlignment="Top" Width="460" />

Working with Buttons:

Buttons are very important user interface components since most events in phone or PC are handled by button clicks.So learning about buttons is more important thing in Windows Phone App.

As usual to add any design component like TextBox,TextBlock or Button in present case All we need to do is just to click on ToolBox and drag and drop the reuired item into the design page.

But drag and dropping components is not a good practice.We should learn working with XAML also but In this stage of development just prefer Drag and Drop .

As already said the natural way to create Button is to add the following code directly

<Button Content="Button" Height="72" HorizontalAlignment="Left" Margin="101,286,0,0" Name="button1" VerticalAlignment="Top" Width="160" />

we will discuss about how to handle events in the coming post.In this we just concentrated only on how to add TextBox,TextBlock and Button into our design. We provided the complete code of what we discussed above for your reference.


<phone:PhoneApplicationPage 
    x:Class="WindowsPhoneApplication1.MainPage"
    xmlns="http://schemas.microsoft.com/winfx/2006/xaml/presentation"
    xmlns:x="http://schemas.microsoft.com/winfx/2006/xaml"
    xmlns:phone="clr-namespace:Microsoft.Phone.Controls;assembly=Microsoft.Phone"
    xmlns:shell="clr-namespace:Microsoft.Phone.Shell;assembly=Microsoft.Phone"
    xmlns:d="http://schemas.microsoft.com/expression/blend/2008"
    xmlns:mc="http://schemas.openxmlformats.org/markup-compatibility/2006"
    mc:Ignorable="d" d:DesignWidth="480" d:DesignHeight="768"
    FontFamily="{StaticResource PhoneFontFamilyNormal}"
    FontSize="{StaticResource PhoneFontSizeNormal}"
    Foreground="{StaticResource PhoneForegroundBrush}"
    SupportedOrientations="Portrait" Orientation="Portrait"
    shell:SystemTray.IsVisible="True">

    <!--LayoutRoot is the root grid where all page content is placed-->
    <Grid x:Name="LayoutRoot" Background="Transparent">
        <Grid.RowDefinitions>
            <RowDefinition Height="Auto"/>
            <RowDefinition Height="*"/>
        </Grid.RowDefinitions>

        <!--TitlePanel contains the name of the application and page title-->
        <StackPanel x:Name="TitlePanel" Grid.Row="0" Margin="12,17,0,28">
            <TextBlock x:Name="ApplicationTitle" Text="MY APPLICATION" Style="{StaticResource PhoneTextNormalStyle}"/>
            <TextBlock x:Name="PageTitle" Text="page name" Margin="9,-7,0,0" Style="{StaticResource PhoneTextTitle1Style}"/>
        </StackPanel>

        <!--ContentPanel - place additional content here-->
        <Grid x:Name="ContentPanel" Grid.Row="1" Margin="12,0,12,0">
            <TextBox Height="72" HorizontalAlignment="Left" Margin="12,116,0,0" Name="textBox1" Text="TextBox" VerticalAlignment="Top" Width="460" />
            <Button Content="Button" Height="72" HorizontalAlignment="Left" Margin="101,286,0,0" Name="button1" VerticalAlignment="Top" Width="160" />
            <TextBlock Height="30" HorizontalAlignment="Left" Margin="145,54,0,0" Name="textBlock1" Text="TextBlock" VerticalAlignment="Top" />
        </Grid>
    </Grid>
    <!--Sample code showing usage of ApplicationBar-->
    <!--<phone:PhoneApplicationPage.ApplicationBar>
        <shell:ApplicationBar IsVisible="True" IsMenuEnabled="True">
            <shell:ApplicationBarIconButton IconUri="/Images/appbar_button1.png" Text="Button 1"/>
            <shell:ApplicationBarIconButton IconUri="/Images/appbar_button2.png" Text="Button 2"/>
            <shell:ApplicationBar.MenuItems>
                <shell:ApplicationBarMenuItem Text="MenuItem 1"/>
                <shell:ApplicationBarMenuItem Text="MenuItem 2"/>
            </shell:ApplicationBar.MenuItems>
        </shell:ApplicationBar>
    </phone:PhoneApplicationPage.ApplicationBar>-->

</phone:PhoneApplicationPage>

Let us discuss about images and creating events for button clicks in upcoming post.

Saturday, 13 April 2013

Windows Phone for Absolute Beginners Part 3

Working with Image Buttons

As we seen in the older post Buttons are very important user elements and in this app we are going to see how to change normal buttons into Image Buttons.

Its very simple here in Visual Studio 2010 to change the properties of any element by using the properties box.

here we just added a Button for our learning purpose You can learn how to work with buttons here

digitalnative

Now click on the button and go to Properties window of Button usually present right side of Visual Studio.Now go to Brush property of button in properties box.

Note for changing color of any UI element like TextBox or TextBox or Button or anything you have to change the Brush property of properties box.

In the case of Button we have three properties in Brush category like Background,Border Brush,Fore ground where the Foreground is the color of the Text visible in the button.To create a Image Button we have to go to background property and click on the ImageBrush button which have a mountain like icon in it as shown in diagram below.


Now you can see select image button.It will open choose image toolbox.From that choose Image from your hard drive and click on Ok button.

But for getting a beautiful button we prefer to give BorderBrush property as transparent then only you can enjoy image button's beauty.

Here is the sample image button we created

digitalnative

Here is the sample code for Image Button we created 


<Button Content="" HorizontalAlignment="Left" Margin="100,92,0,0" VerticalAlignment="Top"   Height="220" Width="281">
                <Button.Background>
                    <ImageBrush Stretch="Fill" ImageSource="/v.png"/>
                </Button.Background>
            </Button>


Windows Phone for Absoulte Beginners Part 1

Introduction to Windows Phone:

Windows Phone is the proprietary mobile OS developed by software giant Microsoft for smartphones.Now Windows Phone is the 3rd largest smartphone OS after iOS and Android.
Microsoft used metro style user interface interface in Windows phone.Windows Phone 8 is the latest mobile OS in Windows Phone family.

Windows Phone Logo


Developing App for Windows Phone:

Windows Phone is a emerging platform in mobile world. So Developers have a wide scope with Windows Phone.Developing App for Windows Phone is very easier.First we see the list of tools to develop Windows Phone Application.

Tools for Creating Applications for Windows phone:

For developing app for Windows phone we need certain software to be installed.All the software are available in free of cost from Microsoft site and here we provided all the direct official links to download the software.

Visual Studio 2010 Express for Windows Phone:

Visual Studio is the Integrated development platform in which we are can design our front and back ends of the apps.

Download Visual Studio from here
Visual Studio 2010 Logo

Windows Phone emulator:

You can download windows phone emulator along with Windows phone SDK from this link here


XNA Game Studio 4.0:

Almost you will get this pack along with your SDK so no need of separate download of this software separately

Silverlight:

Silverlight is the Application Framework developed by Microsoft for rich Internet application.To install Silverlight software download it from the link below

Click here to download Silverlight 

.NET Framework 4:


Like XNA Game Studio you may also get .NET frame work from Windows phone SDK itself so no need to separately download of this software.


System Requirements:

For installing the above software we need the some basic system requirements as follow.


  • Windows 7 or Higher OS (32 or 64 bit)
  • 1 GB RAM for 32 bit and 2 GB RAM for 64 bit.
  • 3 GB Minimum hard disk space
  • Processor with 1.6 GHz speed or more.
  • Direct X 9 capable video card.


Continue reading next post