Saturday, 29 June 2013

Windows Phone for Absoulte Beginners part 4

Working with CheckBox:

windows phone 7


The specialty of check box is that we can choose multiple choices from the given also we can able to select nothing from the list. Check boxes are normally have two states such as checked and unchecked if checked means its Boolean equivalent is true, if unchecked means its Boolean equivalent is false.

Using Check box in Windows phone:

To use Check box in Windows Phone use the following code given below.

<CheckBox Content="Cricket"  Height="72" HorizontalAlignment="Left" Margin="124,133,0,0" Name="checkBox1" VerticalAlignment="Top" Width="144" />

To access the state of Checkbox in c# code use as following
checkBox1.IsChecked
This will return the state of checkbox whether it is checked or not in bool? type
To make Checkbox to be enable by default use the following code
<CheckBox Content="Volley Ball" Height="72" HorizontalAlignment="Left" Margin="124,211,0,0" Name="checkBox4" VerticalAlignment="Top" Width="170" Grid.Row="1" IsChecked="True" />

So the code is actually IsChecked=”True”.

Here we developed a simple application where we have four checkboxes and we show the number of checkboxes in checkboxes checked in run time in a textbox below.

Sample Application:


MainPage.xaml


<phone:PhoneApplicationPage
    x:Class="TextBox.MainPage"
    xmlns="http://schemas.microsoft.com/winfx/2006/xaml/presentation"
    xmlns:x="http://schemas.microsoft.com/winfx/2006/xaml"
    xmlns:phone="clr-namespace:Microsoft.Phone.Controls;assembly=Microsoft.Phone"
    xmlns:shell="clr-namespace:Microsoft.Phone.Shell;assembly=Microsoft.Phone"
    xmlns:d="http://schemas.microsoft.com/expression/blend/2008"
    xmlns:mc="http://schemas.openxmlformats.org/markup-compatibility/2006"
    mc:Ignorable="d" d:DesignWidth="480" d:DesignHeight="768"
    FontFamily="{StaticResource PhoneFontFamilyNormal}"
    FontSize="{StaticResource PhoneFontSizeNormal}"
    Foreground="{StaticResource PhoneForegroundBrush}"
    SupportedOrientations="PortraitOrLandscape" Orientation="Portrait"
    shell:SystemTray.IsVisible="True">

    <!--LayoutRoot is the root grid where all page content is placed-->
    <Grid x:Name="LayoutRoot" Background="Transparent">
        <Grid.RowDefinitions>
            <RowDefinition Height="Auto"/>
            <RowDefinition Height="*"/>
        </Grid.RowDefinitions>

        <CheckBox Content="Cricket" Grid.Row="1" Height="72" HorizontalAlignment="Left" Margin="124,133,0,0" Name="checkBox1" VerticalAlignment="Top" Width="144" />
        <CheckBox Content="Basket Ball" Height="72" HorizontalAlignment="Left" Margin="124,367,0,0" Name="checkBox2" VerticalAlignment="Top" Width="184" Grid.Row="1" />
        <CheckBox Content="Tennis" Height="72" HorizontalAlignment="Left" Margin="124,289,0,0" Name="checkBox3" VerticalAlignment="Top" Width="144" Grid.Row="1" />
        <CheckBox Content="Volley Ball" Height="72" HorizontalAlignment="Left" Margin="124,211,0,0" Name="checkBox4" VerticalAlignment="Top" Width="170" Grid.Row="1" IsChecked="False" />
        <TextBlock Grid.Row="1" Height="47" HorizontalAlignment="Left" Margin="28,94,0,0" Name="textBlock1" Text="Intrested in:" VerticalAlignment="Top" FontSize="32" Width="204" />
        <TextBox Grid.Row="1" Height="72" HorizontalAlignment="Left" Margin="161,617,0,0" Name="textBox1" Text="" VerticalAlignment="Top" Width="147" />
        <TextBlock Grid.Row="1" Height="30" HorizontalAlignment="Left" Margin="124,563,0,0" Name="textBlock2" Text="Number of boxes checked" VerticalAlignment="Top" />
        <!--ContentPanel - place additional content here-->
    </Grid>

</phone:PhoneApplicationPage>

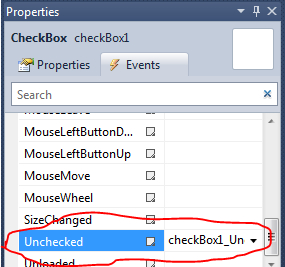
Here we generated two methods checked and unchecked where checked will work whenever the checkbox is checked and whenever checkbox is unchecked uncheck method will work. We provided screen shots of how to generate the Check and Unchecked methods here
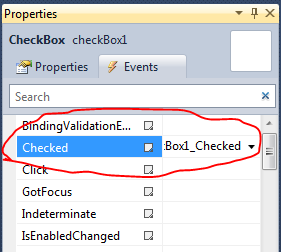

windows phone properties


MainPage.xaml.cs

using System;
using System.Collections.Generic;
using System.Linq;
using System.Net;
using System.Windows;
using System.Windows.Controls;
using System.Windows.Documents;
using System.Windows.Input;
using System.Windows.Media;
using System.Windows.Media.Animation;
using System.Windows.Shapes;
using Microsoft.Phone.Controls;

namespace TextBox
{
    public partial class MainPage : PhoneApplicationPage
    {
        int count = 0;
        // Constructor
        public MainPage()
        {
            InitializeComponent();
        }

     private void checkBox1_Checked(object sender, RoutedEventArgs e)
        {
            count++;
            textBox1.Text = Convert.ToString(count);
        }

    private void checkBox1_Unchecked(object sender, RoutedEventArgs e)
        {
            count--;
            textBox1.Text = Convert.ToString(count);
        }

      private void checkBox4_Checked(object sender, RoutedEventArgs e)
        {
            count++;
            textBox1.Text = Convert.ToString(count);
        }

    private void checkBox4_Unchecked(object sender, RoutedEventArgs e)
        {
            count--;
            textBox1.Text = Convert.ToString(count);
        }

    private void checkBox3_Unchecked(object sender, RoutedEventArgs e)
        {
            count--;
            textBox1.Text = Convert.ToString(count);
        }

      private void checkBox3_Checked(object sender, RoutedEventArgs e)
        {
            count++;
            textBox1.Text = Convert.ToString(count);
        }

      private void checkBox2_Checked(object sender, RoutedEventArgs e)
        {
            count++;
            textBox1.Text = Convert.ToString(count);
        }

    private void checkBox2_Unchecked(object sender, RoutedEventArgs e)
        {
            count--;
            textBox1.Text = Convert.ToString(count);
        }
      
    }
}


Output will be resemble like the one given below

windows phone


Wednesday, 12 June 2013

Setting Icons in Nokia Apps

Setting Icons for Nokia Apps:

Icons are normally 36 * 36 size in Nokia apps (but they are hard to create because of this small size in Photoshop in my experience).

First create an Image with photoshop of size 36 * 36.We are recommending to use only .png format images for icon images.

Now after creating the image add the image to your project by copying image from the source and pasting the image in the res folder.


LWUIT

Now you have to edit the Application Descriptor.The name itself says Application Descriptor defines the properties of our project MIDlet and version ,icon etc

So to set icon open the Application Descriptor file

LWUIT

Now go to the Optional tab in the Application Descriptor where you can see the Optional properties where you can see the MIDlet icon property.

Just enter the image name of your icon with its extension in the MIDlet icon property thats solve you set the icon to your project.

LWUIT icon

Now just run your project once before you create your package for uploading by right click on your project name and give Run as MIDlet application.So you can check the changes there in the emulator

LWUIT Icon


icon
icon.png
We used this icon in our project 


Working with Image & Image Button in LWUIT

Working with Images & Image Button in LWUIT:

In this post we will discuss about how to create an Image button and also how to add text in the image button clearly.

We are using LWUIT in our application so If you want to follow this post you should add and initialize your project with LWUIT. Adding LWUIT is not a difficult one We have a clear post stating how to add and initialize LWUIT in our Application Read that post here.


We used the Project name as Image_Sample and Java file named as ImageSample.Java and we used the image down.jpg and download.jpg in this application

First create a new MIDlet project and add LWUIT to your project then add the Java ME MIDlet file to your project.Then you have to add the Image into your resource folder by copy the source image and paste it in your res folder of your project( Image_Sample/res/ in our case)

To create an Image we should use the following code and it should be enclosed in try catch block

try {
 img=Image.createImage("/down.jpg");
 img1=Image.createImage("/download.jpg");
     } catch (IOException e) {
}

Creating Normal Image in LWUIT:

To create a normal Image you should add the Image to the Label component then you can display the Label in the screen

Label l1=new Label(img);

form.addComponent(l1);

Creating ImageButton in LWUIT

To create a image button you should add the Image object to the Button extension so that the code will be like following

Button b=new Button("Button Text",Image_Object);

e.g
b1=new Button("Click me",img);
b1.setTextPosition(Component.BOTTOM);

Here we provided a sample code which used a simple image and Image button in LWUIT Nokia application

Sample Code:

import java.io.IOException;
import javax.microedition.midlet.MIDlet;
import javax.microedition.midlet.MIDletStateChangeException;
import com.sun.lwuit.Button;
import com.sun.lwuit.Component;
import com.sun.lwuit.Display;
import com.sun.lwuit.Form;
import com.sun.lwuit.Image;
import com.sun.lwuit.Label;

public class ImageSample extends MIDlet {

Form form;
Image img,img1;
Button b1;
public ImageSample() {
// TODO Auto-generated constructor stub
}

protected void destroyApp(boolean arg0) throws MIDletStateChangeException {
// TODO Auto-generated method stub

}

protected void pauseApp() {
// TODO Auto-generated method stub

}

protected void startApp() throws MIDletStateChangeException {
// TODO Auto-generated method stub
Display.init(this);
form=new Form("Image Sample");
try {
img=Image.createImage("/down.jpg");
img1=Image.createImage("/download.jpg");
} catch (IOException e) {
}
   Label l1=new Label(img1);
b1=new Button("Click me",img);
b1.setTextPosition(Component.BOTTOM);
form.addComponent(l1);
form.addComponent(b1);
form.show();
}

}

Your output will resemble the one given below

image button in LWUIT

We used the Images given below for our project
LWUIT
down.jpg

LWUIT
download.jpg


Tuesday, 11 June 2013

Working with Background Image in Nokia LWUIT

Working with Background Image in LWUIT :


Many people like to design their app with good UI ,for that purpose Images specially Background Images play a vital role in UI design.

In this post we clearly explained how to add background image to our LWUIT app with sample coding.

Please refer how to add and Initialise LWUIT in your project here( otherwise you can't use the following code in your project).

After adding LWUIT to your project you should initialise LWUIT project.To initialise LWUIT project use the code given below in the first of startApp() method.

To initialize : 

To initilaize LWUIT 

Display.init(this);

Adding Image to your project:

Before using an image you should add the image into your project.First copy the source image (JPG or PNG format) and now open your Nokia IDE and in the left side under your project name you can notice the "res" folder which should contain the resources like Images for the project.

Now right click on the res folder and paste your image in that folder.

lwuit

lwuit image


Code to Create Image Object:

To create a image object use the following code

Image a=new Image("/Image_name.jpg");

e.g

Image a=new Image("/success.jpg");

Note: Even you are pasting your image in /res/ folder you should mention as /Image_name in the time of creating Image object.Also the Image should be surrounded by Try/Catch block mandatory.

So the code might resemble like one below

 try {
a=Image.createImage("/success.jpg");
     } 
catch (IOException e)
 {
    // TODO Auto-generated catch block
 }

To add Image to the Form:

To add the created Image to the form we should use the following code 

f1.getStyle().setBgImage(Image_object);

e.g

f1.getStyle().setBgImage(a);
digitalnative
success.jpg

Sample code:

//We used success.jpg image in our project
//Project Name:BGImage
//Class Name: Background_Sample


import java.io.IOException;
import javax.microedition.midlet.MIDlet;
import javax.microedition.midlet.MIDletStateChangeException;
import com.sun.lwuit.Display;
import com.sun.lwuit.Form;
import com.sun.lwuit.Image;
import com.sun.lwuit.Label;


public class Background_Sample extends MIDlet {

public Background_Sample() {
// TODO Auto-generated constructor stub
}

protected void destroyApp(boolean unconditional)
throws MIDletStateChangeException {
// TODO Auto-generated method stub

}

protected void pauseApp() {
// TODO Auto-generated method stub

}

protected void startApp() throws MIDletStateChangeException {
// TODO Auto-generated method stub
//Initialize LWUIT
Display.init(this);
Image a = null;
Label l1;
//Creation of Form
Form f1=new Form("BG Image Sample");
try {

a=Image.createImage("/success.jpg");

                 catch (IOException e)
                 {
                 }
}
f1.getStyle().setBgImage(a);
f1.show();
}
}

The output will resemble the one like below

lwuit bg image


Sunday, 9 June 2013

Nokia Mobile Phone Application Development Stage 4

Sample App for understanding LWUIT :

asha mobile application

We discussed about using what is LWUIT ,what are the components of LWUIT and how to implement LWUIT in our project .If you are new to this topic please go through previous post before reading this post.

So here we created a very small sample app for better understanding

Sample App:

We hope you finished steps upto implementation of LWUIT into your project already.If not please start from the previous post since this is a continuation post of previous one.

Step 8:(First 7 steps available in previous post Refer it) Your code may resemble the one below after adding your Java ME MIDlet file to your project


import javax.microedition.midlet.MIDlet;

import javax.microedition.midlet.MIDletStateChangeException;

public class TestClass extends MIDlet {
public TestClass() {
// TODO Auto-generated constructor stub
}
protected void destroyApp(boolean arg0) throws MIDletStateChangeException {
// TODO Auto-generated method stub

}
protected void pauseApp() {
// TODO Auto-generated method stub

}
protected void startApp() throws MIDletStateChangeException {
// TODO Auto-generated method stub

}
}

Here startApp() -This method works whenever the app is started.

destroyApp() -Whenever we exit from our app destroy app will work

So lets start a sample app in this post.

To initialize LWUIT we need to use Display.init(this) in startApp() then we have to create a form and then have to add our UI components to the form.

For your convenience and reference we mentioned every UI component and their syntax in a separate post Please refer it.


Sample Code:(For Calculating EMI)

protected void startApp() throws MIDletStateChangeException {
// TODO Auto-generated method stub
Display.init(this);
b1=new Button("EMI Calculator");
b2=new Button("Help");
b3=new Button("About");
b4=new Button("Exit");
Form f1=new Form("Welcome");
b1.addActionListener(this);
b2.addActionListener(this);
b3.addActionListener(this);
b4.addActionListener(this);
f1.addComponent(b1);
f1.addComponent(b2);
f1.addComponent(b3);
f1.addComponent(b4);
f1.show();


}
public void actionPerformed(ActionEvent ae) { 
if(ae.getSource()==b1)
{
final Form f2=new Form("Calculate your EMI");
final Label l1=new Label("Enter principal amount");
final TextField t1=new TextField("");
t1.setConstraint(TextField.NUMERIC);
final Label l2=new Label("Enter Rate of Interest per annum");
final TextField t2=new TextField("");
t2.setConstraint(TextField.NUMERIC);
final Label l3=new Label("Enter no of months");
final TextField t3=new TextField("");
t3.setConstraint(TextField.NUMERIC);
final Button b11=new Button("Calculate");
Command back=new Command("Back"){
public void actionPerformed(ActionEvent evt) {
                 // do something
try {
startApp();
} catch (MIDletStateChangeException e) {
// TODO Auto-generated catch block
e.printStackTrace();
}
           }
      };


f2.addCommand(back);
f2.setBackCommand(back);
b11.addActionListener(new ActionListener() 
{
public void actionPerformed(ActionEvent evt)
{

if(t1.getText()=="" || t2.getText()=="" || t3.getText()=="")
{
Label err=new Label("Enter valid Input");
validDialog = new Dialog("Your EMI");
validDialog.setScrollable(false);
validDialog.setTimeout(2000);
validDialog.addComponent(err);

validDialog.showDialog();
}
else
{
double a=Double.parseDouble(t1.getText());
double b=Double.parseDouble(t2.getText());
double c=Double.parseDouble(t3.getText());
double f=b/1200;
double d=pow2(f+1,c);
double e=a*f*d/(d-1);
Label answer2=new Label(""+e);
al=new Alert(""+e);
 validDialog = new Dialog("Your EMI");
validDialog.setScrollable(false);
validDialog.setTimeout(5000);
validDialog.addComponent(answer2);

validDialog.showDialog();
}
}
private double pow2(double d, double c) {
// TODO Auto-generated method stub
double total=1;
   for(int i=1;i<=c;i++){
       total*=d;
   }
   return total;
}
});
f2.addComponent(l1);
f2.addComponent(t1);
f2.addComponent(l2);
f2.addComponent(t2);
f2.addComponent(l3);
f2.addComponent(t3);
f2.addComponent(b11);
f2.show();
}
if(ae.getSource()==b2)
{
Form f3=new Form("HELP");
Label a,c,d,e,f,g;
a=new Label("EMI CALCULATION");
c=new Label("Formula ");
d=new Label("E = P×r×(1 + r)n/((1 + r)n - 1)");
e=new Label("P -> Principal");
f=new Label("r -> Rate of Interest");
g=new Label("n -> No. of Months");
Command back=new Command("Back"){
public void actionPerformed(ActionEvent evt) {
               // do something
try {
startApp();
} catch (MIDletStateChangeException e) {
// TODO Auto-generated catch block
e.printStackTrace();
}
         }
    };
       f3.addCommand(back);
       f3.setBackCommand(back);
f3.addComponent(a);
f3.addComponent(c);
f3.addComponent(d);
f3.addComponent(e);
f3.addComponent(f);
f3.addComponent(g);
f3.show();
}
if(ae.getSource()==b3)
{
Form f3=new Form("About");
Label a,b,c,d;
d=new Label("Developed by");
a=new Label("Digital Native Team");
b=new Label("App name: EMI Calculator");
c=new Label("Version Number:1.0.0");
f3.addComponent(d);
f3.addComponent(a);
f3.addComponent(b);
f3.addComponent(c);

Command back=new Command("Back"){
public void actionPerformed(ActionEvent evt) {
                // do something
try {
startApp();
} catch (MIDletStateChangeException e) {
// TODO Auto-generated catch block
e.printStackTrace();
}
          }
     };
  f3.addCommand(back);
f3.setBackCommand(back);
        f3.show();
}
if(ae.getSource()==b4)
{
notifyDestroyed();
}
}


}