Showing posts with label Nokia App Development. Show all posts

Tuesday, 30 July 2013

Developing Nokia App in 5 Minutes

Developing Web App in Nokia in 5 Minutes:

Xpress WebApp Builder:

nokia web app

In Nokia we can develop two types of Apps such as

  • Java App
  • Web App
In this post we are going to discuss about how to develop Nokia web app in minutes using the Express web app builder tool provided by Nokia.


nokia webapps

  • Now click on Agree button for the terms and conditions page appear after Try it now button click.
Nokia app


  • Now enter your app name in the next step as shown below
nokia web app


  • Now you will get the list of templates available with the xpress web app tool as shown below.Now enter your app title (will be shown in your mobile phone top) in the first page.
xpress web app builder
  • Now click on next button you will get the Add widget page with options like Feeds, Twitter, Facebook, Youtube, Clip etc. (In this demo I am gonna show you how to develop app with feed using my blog address only for your understanding purpose )
  • Drag and drop the feed widget logo as below
web app builder


  • Now enter the website address you wish to get the feeds and click on go button and now the web app builder will automatically loads the feeds from the website (In my example I fetched feeds from www.digitalnativetech.blogspot.in blog).
xpress web app nokia


  • You can change the number of feeds to be displayed in the mobile by adjusting the seek bar of number of feed items (Max upto 10 feeds you can display).
  • Next page is the very important page where you can add advertisements to your applications so that you can earn more with your app simply by showing ads in your app)
  • You will get the following widgets in the next page
nokia widgets


  • Now just drag and drop the advertisment logo (Ads logo) into your phone design and now you will be asked for the application ID which you have to create in your nax account.
nax account

  • To create an application id click on the Nokia Ad Exchange Site link in the page and login ( If you dont have any account in nax create one in this site surely).
  • To create a new account please provide your details in the form available and click get started now
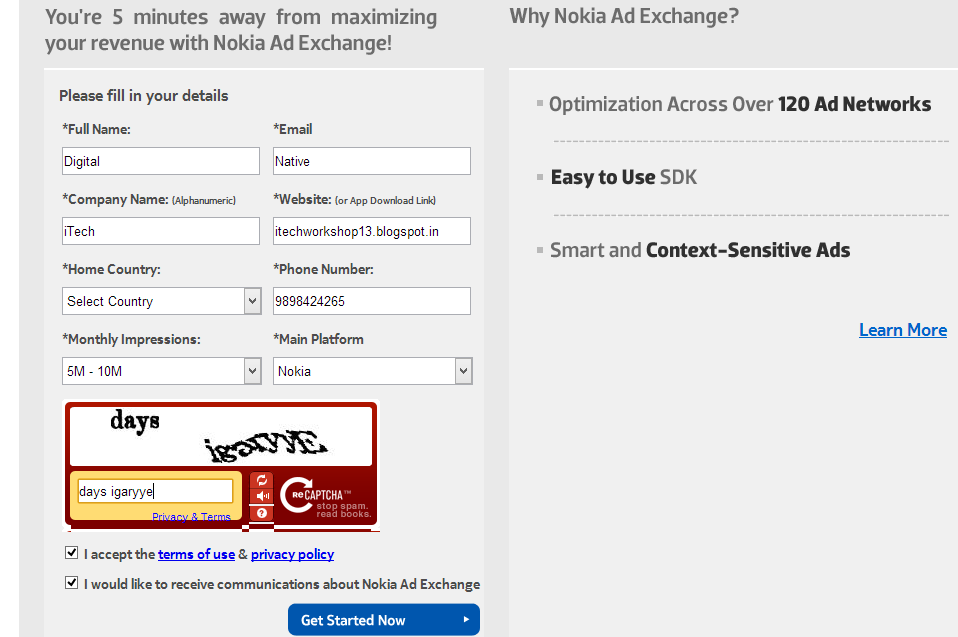
nax account

  • Now click on Get Started now button after entering your details (if you dont have a website please atleast create a blog in blogger.com which will be very simple and useful for you in your career) 
  • Now nax will send you a confirmation mail to your mail address and it will take surely some time to approve your account so please be patience on those time since this is the very important step).
  • After getting your confirmation mail from nax account sign in into your nax account now as shown below
nokia nax account


  • Now click on Login and choose Add App button and enter your app details and I simply entered my app details for your reference.
nokia nax account

  • Now click on create button and copy the Application ID and paste it in the Nokia xpresswebapp builder site and click on go button now the add will be loaded in your app like below


  • Thats it your app is almost done now you have to publish your app so click on Finish button first.Now it will ask you to enter your nokia account and password( If you dont have an nokia account create one by click on register in the bottom of the Nokia login page)
  • Now you have to create your app final details in the page like below in next step.(keep in mind you should have an account in publish.nokia.com and it will surely ask you to pay 1 euro for creating account in publish.nokia)


  • You can even change the icon of your own and now enter your author name and author mail id as yours and click on save so your app is ready and now click on Publish Your App and your publishing details of your application.

publish.nokia


  • Now click on continue so web app builder will now create your app package and publish it to your nokia account.It may take at least 3 or 5 days to publish your app in OVI Store surely.
To see your app status click on view store status (store icon) as shown below in the following screen shot
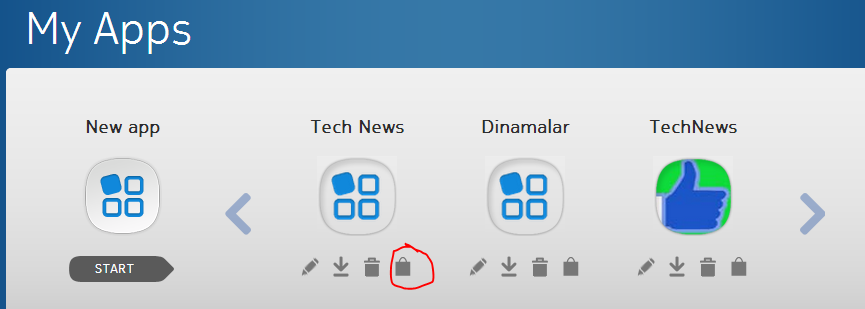
publish.nokia

  • So we can develop any number of apps like this and earn through this web app
Hope you enjoyed the post

If you have query please feel free to mail us at digitalnativehelp@gmail.com


Wednesday, 12 June 2013

Setting Icons in Nokia Apps

Setting Icons for Nokia Apps:

Icons are normally 36 * 36 size in Nokia apps (but they are hard to create because of this small size in Photoshop in my experience).

First create an Image with photoshop of size 36 * 36.We are recommending to use only .png format images for icon images.

Now after creating the image add the image to your project by copying image from the source and pasting the image in the res folder.


LWUIT

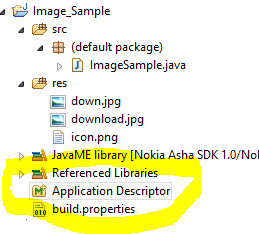
Now you have to edit the Application Descriptor.The name itself says Application Descriptor defines the properties of our project MIDlet and version ,icon etc

So to set icon open the Application Descriptor file

LWUIT

Now go to the Optional tab in the Application Descriptor where you can see the Optional properties where you can see the MIDlet icon property.

Just enter the image name of your icon with its extension in the MIDlet icon property thats solve you set the icon to your project.

LWUIT icon

Now just run your project once before you create your package for uploading by right click on your project name and give Run as MIDlet application.So you can check the changes there in the emulator

LWUIT Icon


icon
icon.png
We used this icon in our project 


Working with Image & Image Button in LWUIT

Working with Images & Image Button in LWUIT:

In this post we will discuss about how to create an Image button and also how to add text in the image button clearly.

We are using LWUIT in our application so If you want to follow this post you should add and initialize your project with LWUIT. Adding LWUIT is not a difficult one We have a clear post stating how to add and initialize LWUIT in our Application Read that post here.


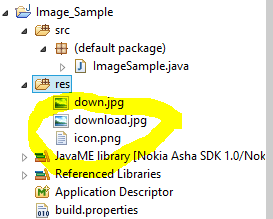
We used the Project name as Image_Sample and Java file named as ImageSample.Java and we used the image down.jpg and download.jpg in this application

First create a new MIDlet project and add LWUIT to your project then add the Java ME MIDlet file to your project.Then you have to add the Image into your resource folder by copy the source image and paste it in your res folder of your project( Image_Sample/res/ in our case)

To create an Image we should use the following code and it should be enclosed in try catch block

try {
 img=Image.createImage("/down.jpg");
 img1=Image.createImage("/download.jpg");
     } catch (IOException e) {
}

Creating Normal Image in LWUIT:

To create a normal Image you should add the Image to the Label component then you can display the Label in the screen

Label l1=new Label(img);

form.addComponent(l1);

Creating ImageButton in LWUIT

To create a image button you should add the Image object to the Button extension so that the code will be like following

Button b=new Button("Button Text",Image_Object);

e.g
b1=new Button("Click me",img);
b1.setTextPosition(Component.BOTTOM);

Here we provided a sample code which used a simple image and Image button in LWUIT Nokia application

Sample Code:

import java.io.IOException;
import javax.microedition.midlet.MIDlet;
import javax.microedition.midlet.MIDletStateChangeException;
import com.sun.lwuit.Button;
import com.sun.lwuit.Component;
import com.sun.lwuit.Display;
import com.sun.lwuit.Form;
import com.sun.lwuit.Image;
import com.sun.lwuit.Label;

public class ImageSample extends MIDlet {

Form form;
Image img,img1;
Button b1;
public ImageSample() {
// TODO Auto-generated constructor stub
}

protected void destroyApp(boolean arg0) throws MIDletStateChangeException {
// TODO Auto-generated method stub

}

protected void pauseApp() {
// TODO Auto-generated method stub

}

protected void startApp() throws MIDletStateChangeException {
// TODO Auto-generated method stub
Display.init(this);
form=new Form("Image Sample");
try {
img=Image.createImage("/down.jpg");
img1=Image.createImage("/download.jpg");
} catch (IOException e) {
}
   Label l1=new Label(img1);
b1=new Button("Click me",img);
b1.setTextPosition(Component.BOTTOM);
form.addComponent(l1);
form.addComponent(b1);
form.show();
}

}

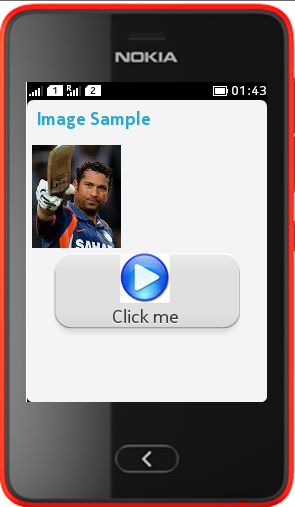
Your output will resemble the one given below

image button in LWUIT

We used the Images given below for our project
LWUIT
down.jpg

LWUIT
download.jpg


Tuesday, 11 June 2013

Working with Background Image in Nokia LWUIT

Working with Background Image in LWUIT :


Many people like to design their app with good UI ,for that purpose Images specially Background Images play a vital role in UI design.

In this post we clearly explained how to add background image to our LWUIT app with sample coding.

Please refer how to add and Initialise LWUIT in your project here( otherwise you can't use the following code in your project).

After adding LWUIT to your project you should initialise LWUIT project.To initialise LWUIT project use the code given below in the first of startApp() method.

To initialize : 

To initilaize LWUIT 

Display.init(this);

Adding Image to your project:

Before using an image you should add the image into your project.First copy the source image (JPG or PNG format) and now open your Nokia IDE and in the left side under your project name you can notice the "res" folder which should contain the resources like Images for the project.

Now right click on the res folder and paste your image in that folder.

lwuit

lwuit image


Code to Create Image Object:

To create a image object use the following code

Image a=new Image("/Image_name.jpg");

e.g

Image a=new Image("/success.jpg");

Note: Even you are pasting your image in /res/ folder you should mention as /Image_name in the time of creating Image object.Also the Image should be surrounded by Try/Catch block mandatory.

So the code might resemble like one below

 try {
a=Image.createImage("/success.jpg");
     } 
catch (IOException e)
 {
    // TODO Auto-generated catch block
 }

To add Image to the Form:

To add the created Image to the form we should use the following code 

f1.getStyle().setBgImage(Image_object);

e.g

f1.getStyle().setBgImage(a);
digitalnative
success.jpg

Sample code:

//We used success.jpg image in our project
//Project Name:BGImage
//Class Name: Background_Sample


import java.io.IOException;
import javax.microedition.midlet.MIDlet;
import javax.microedition.midlet.MIDletStateChangeException;
import com.sun.lwuit.Display;
import com.sun.lwuit.Form;
import com.sun.lwuit.Image;
import com.sun.lwuit.Label;


public class Background_Sample extends MIDlet {

public Background_Sample() {
// TODO Auto-generated constructor stub
}

protected void destroyApp(boolean unconditional)
throws MIDletStateChangeException {
// TODO Auto-generated method stub

}

protected void pauseApp() {
// TODO Auto-generated method stub

}

protected void startApp() throws MIDletStateChangeException {
// TODO Auto-generated method stub
//Initialize LWUIT
Display.init(this);
Image a = null;
Label l1;
//Creation of Form
Form f1=new Form("BG Image Sample");
try {

a=Image.createImage("/success.jpg");

} 
                 catch (IOException e)
                 {
                 }
}
f1.getStyle().setBgImage(a);
f1.show();
}
}

The output will resemble the one like below

lwuit bg image


Sunday, 9 June 2013

Nokia Mobile Phone Application Development Stage 4

Sample App for understanding LWUIT :

asha mobile application

We discussed about using what is LWUIT ,what are the components of LWUIT and how to implement LWUIT in our project .If you are new to this topic please go through previous post before reading this post.

So here we created a very small sample app for better understanding

Sample App:

We hope you finished steps upto implementation of LWUIT into your project already.If not please start from the previous post since this is a continuation post of previous one.

Step 8:(First 7 steps available in previous post Refer it) Your code may resemble the one below after adding your Java ME MIDlet file to your project


import javax.microedition.midlet.MIDlet;

import javax.microedition.midlet.MIDletStateChangeException;

public class TestClass extends MIDlet {
public TestClass() {
// TODO Auto-generated constructor stub
}
protected void destroyApp(boolean arg0) throws MIDletStateChangeException {
// TODO Auto-generated method stub

}
protected void pauseApp() {
// TODO Auto-generated method stub

}
protected void startApp() throws MIDletStateChangeException {
// TODO Auto-generated method stub

}
}

Here startApp() -This method works whenever the app is started.

destroyApp() -Whenever we exit from our app destroy app will work

So lets start a sample app in this post.

To initialize LWUIT we need to use Display.init(this) in startApp() then we have to create a form and then have to add our UI components to the form.

For your convenience and reference we mentioned every UI component and their syntax in a separate post Please refer it.


Sample Code:(For Calculating EMI)

protected void startApp() throws MIDletStateChangeException {
// TODO Auto-generated method stub
Display.init(this);
b1=new Button("EMI Calculator");
b2=new Button("Help");
b3=new Button("About");
b4=new Button("Exit");
Form f1=new Form("Welcome");
b1.addActionListener(this);
b2.addActionListener(this);
b3.addActionListener(this);
b4.addActionListener(this);
f1.addComponent(b1);
f1.addComponent(b2);
f1.addComponent(b3);
f1.addComponent(b4);
f1.show();


}
public void actionPerformed(ActionEvent ae) { 
if(ae.getSource()==b1)
{
final Form f2=new Form("Calculate your EMI");
final Label l1=new Label("Enter principal amount");
final TextField t1=new TextField("");
t1.setConstraint(TextField.NUMERIC);
final Label l2=new Label("Enter Rate of Interest per annum");
final TextField t2=new TextField("");
t2.setConstraint(TextField.NUMERIC);
final Label l3=new Label("Enter no of months");
final TextField t3=new TextField("");
t3.setConstraint(TextField.NUMERIC);
final Button b11=new Button("Calculate");
Command back=new Command("Back"){
public void actionPerformed(ActionEvent evt) {
                 // do something
try {
startApp();
} catch (MIDletStateChangeException e) {
// TODO Auto-generated catch block
e.printStackTrace();
}
           }
      };


f2.addCommand(back);
f2.setBackCommand(back);
b11.addActionListener(new ActionListener() 
{
public void actionPerformed(ActionEvent evt)
{

if(t1.getText()=="" || t2.getText()=="" || t3.getText()=="")
{
Label err=new Label("Enter valid Input");
validDialog = new Dialog("Your EMI");
validDialog.setScrollable(false);
validDialog.setTimeout(2000);
validDialog.addComponent(err);

validDialog.showDialog();
}
else
{
double a=Double.parseDouble(t1.getText());
double b=Double.parseDouble(t2.getText());
double c=Double.parseDouble(t3.getText());
double f=b/1200;
double d=pow2(f+1,c);
double e=a*f*d/(d-1);
Label answer2=new Label(""+e);
al=new Alert(""+e);
 validDialog = new Dialog("Your EMI");
validDialog.setScrollable(false);
validDialog.setTimeout(5000);
validDialog.addComponent(answer2);

validDialog.showDialog();
}
}
private double pow2(double d, double c) {
// TODO Auto-generated method stub
double total=1;
   for(int i=1;i<=c;i++){
       total*=d;
   }
   return total;
}
});
f2.addComponent(l1);
f2.addComponent(t1);
f2.addComponent(l2);
f2.addComponent(t2);
f2.addComponent(l3);
f2.addComponent(t3);
f2.addComponent(b11);
f2.show();
}
if(ae.getSource()==b2)
{
Form f3=new Form("HELP");
Label a,c,d,e,f,g;
a=new Label("EMI CALCULATION");
c=new Label("Formula ");
d=new Label("E = P×r×(1 + r)n/((1 + r)n - 1)");
e=new Label("P -> Principal");
f=new Label("r -> Rate of Interest");
g=new Label("n -> No. of Months");
Command back=new Command("Back"){
public void actionPerformed(ActionEvent evt) {
               // do something
try {
startApp();
} catch (MIDletStateChangeException e) {
// TODO Auto-generated catch block
e.printStackTrace();
}
         }
    };
       f3.addCommand(back);
       f3.setBackCommand(back);
f3.addComponent(a);
f3.addComponent(c);
f3.addComponent(d);
f3.addComponent(e);
f3.addComponent(f);
f3.addComponent(g);
f3.show();
}
if(ae.getSource()==b3)
{
Form f3=new Form("About");
Label a,b,c,d;
d=new Label("Developed by");
a=new Label("Digital Native Team");
b=new Label("App name: EMI Calculator");
c=new Label("Version Number:1.0.0");
f3.addComponent(d);
f3.addComponent(a);
f3.addComponent(b);
f3.addComponent(c);

Command back=new Command("Back"){
public void actionPerformed(ActionEvent evt) {
                // do something
try {
startApp();
} catch (MIDletStateChangeException e) {
// TODO Auto-generated catch block
e.printStackTrace();
}
          }
     };
  f3.addCommand(back);
f3.setBackCommand(back);
        f3.show();
}
if(ae.getSource()==b4)
{
notifyDestroyed();
}
}


}


Nokia Mobile Application Development LWUIT Components and Syntax

LWUIT Components and their syntax:

asha application development

We created this separate post of UI components and their syntax for your convenience and reference.

Form:

To create a Form

Form f1=new Form("Music Player");

To add a component to form

f1,addComponent(new Label("Hai This is a lable"));

To add a command to form

f1,addCommand(new Command("back"));

To Display a form

f1,show();

Label:

To Create a Label

Label a=new Label("Hai i am a label");

To Change Alignment of Label

a.getStyle().setAlignment(Label.CENTER);

BUTTON:

To Create a Button

Button b= new Button("Button_Name to be displayed");

e.g

Button b=new Button("Calculate");

To Create action Listener for Button

b.addActionListener(new ActionListener() {
 public void actionPerformed(ActionEvent ae)
{
  <---------------Action to be Performed byButtton Event--------------->
}
});

RADIO BUTTON:

To Create a RadioButton

RadioButton rb =new RadioButton("I am Radio Button !");

SLIDER:

To create a Slider

Slider a=new Slider();
a,setInfinite(true);

TABS:

To create Tabs

Tabs t=new Tabs();

To add components to Tabs

t.addTab("Tab 1",new Form("Form_Title"));
t.addTab("Tab 2",new Label("I am a Label in Form 2"));

TEXT AREA:

To add components to TextArea

TextArea a=new TextArea("This is a TextArea Component");

To set Number of Rows and Columns

TextArea a=new TextArea("This is a TextArea with Component" ,20,4);

To Change Editable property of TextArea

a.setEditable(false);

a.setGrowByContent(true);

TextField:

To Create TextField

TextField a = new TextField(“This is a text field”);